 I bet that most retired teachers get some sort of niggling sensation every August/
September season. They remember all the prep and hype and perhaps anxiety over the return to school. For three years now I have been one of the lucky ones that starts to feel that anxiety coming on, then realizes, hey, not me! I'm retired!
One of the common activities through the ages during those first days of school has been that classic assignment to write an essay on "how I spent my summer vacation". That exactly is what I assigned myself for this blog. Maybe I was wanting to momentarily step back into that teacher mode. Momentarily I said!
How I Spent My Summer Vacation
This summer I built a cactus garden. I did a lot of other fun things, like grow a beautiful vegetable and flower garden, hung out with grandkids for two weeks, had a great trip to Alaska, etc., but my main activity was building a cactus garden. Perhaps I should add that this cactus garden was totally out of fabric. And when I say build, I mean from the ground up, from scratch. I started with my favorite white cotton, a set of dyes, some batting and lots of thread and proceeded to build a cactus garden.
Last winter in Mexico I met a couple from Edmonton who liked my work and they decided to hire me to create a large piece for their home. After much talking, e-mailing, photo transfers, and negotiations, it was decided that I would create a cactus/desert scene in a tryptich form, each of the three panels being 30"x72". Because I needed to fill a large space in my Mazatlan gallery, I decided to also make three for myself, and let them choose which they liked out of the total.
They sent pictures of their living room and a paint swatch of their wall color. The rest was up to me.
First I decided on the color pallete I would use. Then I dyed a large collection of fabric to use for the cactus forms. I loved working with the colors and the textures and trying to get as many different pieces as possible. The background pieces were my next challenge.
I loved working with the colors and the textures and trying to get as many different pieces as possible. The background pieces were my next challenge.  I wanted a gradation of color with a sky painted on the top portion to imply the feel of a desert scape. Then I was ready to start putting the shapes and forms on the backgrounds. I had decided to use the barrel, prickly pear, yucca and saguaro shapes. I placed them with raw edge exposed, then stitched them down securely with a zigzag stitch. After the entire scene on all six panels was completed, I sandwiched them with batting and backings and proceeded to free-motion quilt the top with texture, texture and more texture.
  When completed, I tossed them in a gentle wash and machine dried them to increase the texture. This week I am putting on bindings and tabs at the top and all other finishing touches.
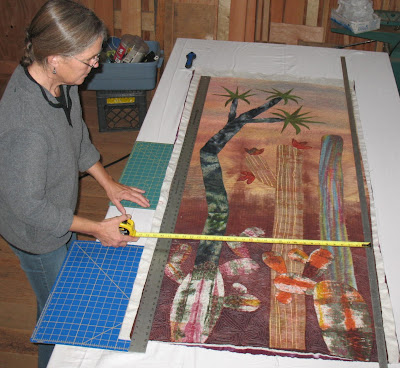
Guess what's going to be displayed on my First Friday Web Walk in September?
.JPG)
 Her e-mail requested some more fabric, so when we drove through B-ham on our way to Mexico, I stopped and made a connection with her. The seeds of friendship were planted and on their way.
.JPG)
.JPG) I was a bit disappointed with our results as I could tell that the dyes were old and not up to the best color. But she was HAPPY! One of my favorite pieces of the day was made by making penny sandwiches on the cotton: a penny on each side of the cotton, then secured tightly with a small clamp. They produced a lovely dotted piece.
I was a bit disappointed with our results as I could tell that the dyes were old and not up to the best color. But she was HAPPY! One of my favorite pieces of the day was made by making penny sandwiches on the cotton: a penny on each side of the cotton, then secured tightly with a small clamp. They produced a lovely dotted piece. And Suzie found a pine branch, attached it to her piece for dyeing, and yes, the form or impression of the needles could beautifully be seen on the finished piece.
 .JPG)
.JPG)
.JPG)
.JPG)
.JPG) Will I throw away my Safeway bag? Not on your life! But this one is already packed with all my daily traveling essentials and has taken its place in the arena of "favorite bag of the moment"!
Will I throw away my Safeway bag? Not on your life! But this one is already packed with all my daily traveling essentials and has taken its place in the arena of "favorite bag of the moment"!
 In 1985 my son, Ben, was born in Gustavus, and he was one of four in that era's "baby group". It was only natural that we four moms established a habit of taking a daily walk with babes in backpacks which included all the sharing that young mothers are known to do. Last Monday, one of those backpack infants (Erin) married Ben's cousin, Travis.
  By returning to Gustavus, I stepped into a family scene of my past and was warmly welcomed by all. I was also reunited with some great women friends, and was included in the daily dock walk which resembled the walks I previously described, minus the backpacks and babies.
  Back in my Gustavus days, I worked at the local school as a teacher's aide, and cooked at the local Gustavus Inn during summers. Here's friend and owner JoAnn in her typical welcoming mode.
 She also has found a voice in her art and I so enjoyed seeing her projects in the fiber and watercolor realms. JoAnn's work is full of color and lightness and whimsy to me.
 JoAnn was also displaying quilts of another of our backpack kids from days-gone-by, Breena, who now is a recent marine biology graduate AND quilter. This quilt is a bookcase of her favorite childrens' books. It probably should be rotated 90 degrees to the left to look like an actual bookcase with books, but I liked reading the titles; I'll Love You Forever has always been one of my favorites too.
 Another highlight to the weekend was seeing my former sister-in-law, Donna, who also was starring in the role of "mother of the groom". (She played the part well!) She is the proud mother of 6...her 3 boys (ages 33, 30 and 27) and her 3 girls (ages 4, 5 and 6 or thereabouts). Yes, 4, 5, and 6...it's enough to make me exhausted just thinking about it! Her beautiful girls are recent adoptees from China and last Monday they were special little flower girls to precede the bride and groom. Sweet cousin and ringbearer, Jackson, follows along.
 I enjoyed traveling around town, seeing how things had changed in the past 20 years. Gustavus has acquired many facilities and businesses that make living there (particularly in the winter) much easier and better for one's mental health than back in the old days. A beautiful new library is certainly a welcomed addition. I knew I couldn't miss visiting this place that now displays what I refer to as my "divorce quilt". I had collected squares from other women, all with the theme of Canadian geese, to piece together and construct borders during those weeks prior to leaving my marriage. There are big chunks of my emotions stitched all over that piece.
 Also at the library is a history quilt that was headed up by JoAnn. Local history goes back a more than 100 years, and my son's family is a big part of the lore of this small town. I recognized many of the names of the featured families. The black and white photos added a wonderful vintage feel to the quilt.
 Reconnecting with friends, attending the wedding, seeing my son, re-experiencing the beauty of the Glacier Bay area, and being welcomed by my former husband and his family were certainly affirming for me. Time travel it was, and five days was perfect. I don't think I'll wait 20 years for my next visit.


